This guide contains the instruction on using the two consumer tools on the efficienctglazing.net website. They are:
-
The Simple Window Comparison Tool allows comparison of one generic window with another to show the savings in both energy and Green House Gas emissions by using a more energy efficient window.
-
The Window Comparison Tool allows up to three different WERS certified products to be compared to a generic base window on the one screen.
Both of the tools are based on the location and size of the house and provide valuable information for making an informed decision about the type of window, or Applied Window film, that will provide the best energy efficiency outcome.
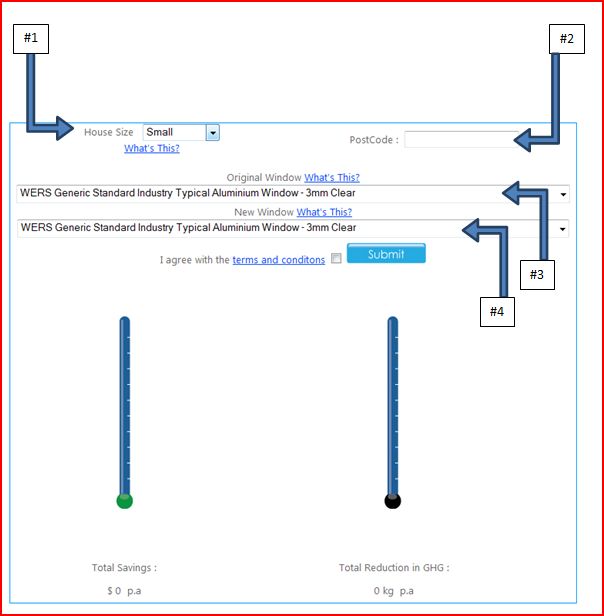
The Simple Window Comparison Tool
The Simple Window Comparison Tool allows comparison of the improvement that is possible when changing from one base window product to another.
This guide will step through each of the input fields and help with understanding what inputs are needed to get the most realistic results for your house.
-
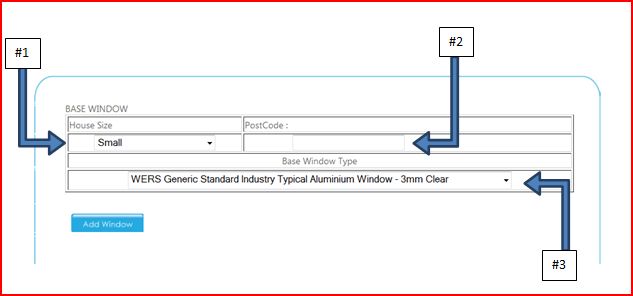
Assign a house size. This house size should be as close to your house as possible and can be selected from the dropdown menu. There are three house sizes to choose from.
-
Small House – 103m2
-
Medium House – 172.5m2
-
Large House – 241.3m2
-
Postcode input. The postcode input assigns a climate zone to the calculations. This is an essential step as climates vary vastly throughout Australia and can cause large variations in the results. The postcode also allows the assignment the prices for electricity and gas in each state.
-
Select the base windows for the house. This step gives a base point for the windows and allows calculation of savings.When selecting a base window it should be representative of the windows currently in the house if upgrading the windows. If embarking on a new build select the windows that are of a minimum standard to see the savings that can be made by choosing high performing energy efficient windows. The dropdown menu allows you to select from a set of WERS Standard Industry Generic windows. These windows provide energy efficiency performance levels which all WERS members can meet with their products. A list of the WERS base windows is in Appendix 1.
-
Select the improved windows for the house. When selecting an improved window it should be representative of the windows being considered for the house. This allows calculation of the savings benefit that can be achieved by using more efficient windows. Select from the dropdown set of WERS Standard Industry Generic windows. These windows provide energy efficiency performance levels which all WERS members can meet with their products. A list of the WERS base windows is in Appendix 1.
-
Results: The results displayed by this tool indicate two main factors; the dollar savings achievable based on the window improvement supplied in the calculation and the Green House Gas reduction that can be made.
Note: It is important to understand that the results displayed by this tool are generic. They are based on generic house types with specified insulation levels, specified design and the same window installed in every opening in the house. For more details please read the Terms and Conditions of Use.
The Window Comparison Tool
The Window Comparison Tool allows comparison of up to three different WERS Certified window products against a base window. The following guide will explain each of the input fields to help understand what inputs are appropriate to achieve a scenario realistic to your house.
-
Assign a house size. This house size should be as close to your house as possible and can be selected from the dropdown menu. There are three house sizes to choose from and they are:
-
Small House – 103m2
-
Medium House – 172.5m2
-
Large House – 241.3m2
-
Postcode input. The postcode input assigns a climate zone to the calculations. This is an essential step as climates vary vastly throughout Australia and can cause large variations in the results. The postcode also allows the assignment the prices for electricity and gas in each state.
-
Select the base windows for the house. This step gives a base point for the windows and allows calculation of savings. When selecting a base window it should be representative of the windows currently in the house if upgrading the windows. If embarking on a new build select the windows that are of a minimum standard to see the savings that can be made by choosing high performing energy efficient windows. The dropdown menu allows you to select from a set of WERS Standard Industry Generic windows. These windows provide energy efficiency performance levels which all WERS members can meet with their products. A list of the WERS base windows is in Appendix 1.
-
Select an Improved Window to calculate the energy savings. This window can be any of the WERS Certified Window or Film Products. The process is:
-
Click the “Add Window” Button
-
Select either the “Window” or “Applied Film” option from the drop down list.
-
Select a Manufacturer from the drop down list
-
Select a Certified Window Product from the drop down list
-
Select a glass type from the drop down list
-
Once all selections are made click the “Select Window” Button.
-
If you have made a mistake or wish to try another option click the “Change Window” Button.
-
Up to three different windows can be added using the “Add Window” button. This will allow comparison on the same page of the savings made using each of these windows against the base window.
-
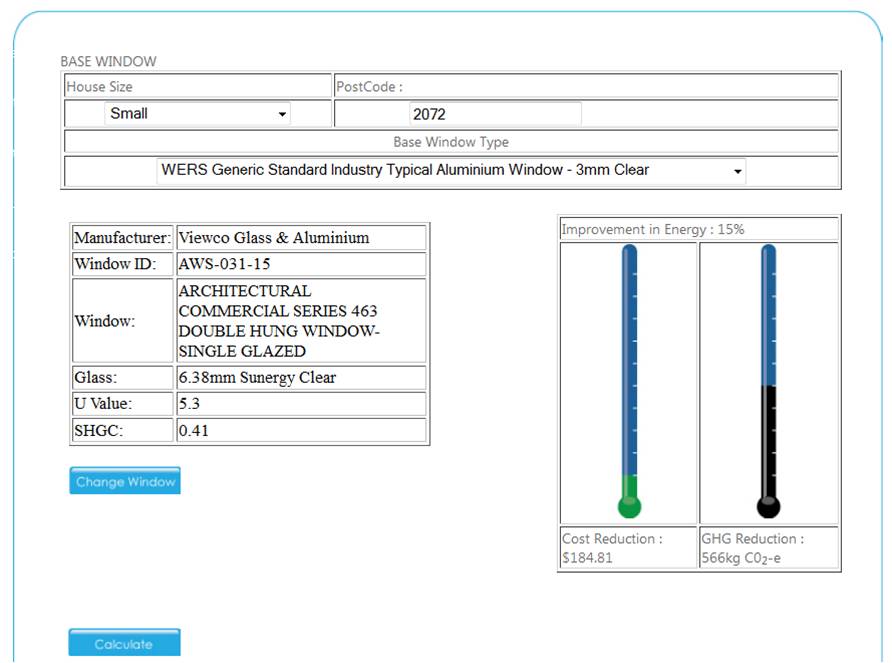
Once all windows are selected click on the “Calculate” Button.
-
The results will appear as shown in the figure below. The sample resultsdisplayed in this example show an annual 15% improvement in energy usage, $184.81 savings on energy and the Green House Gas reduction of 566 kg of CO2-e for the house specified in the calculation.
APPENDIX 1
|